Third-party platform
Currently, Modern.js officially supports deployment on (🚫 indicates not supported, ❔ indicates unverified)
| Platform | CSR/SSG | SSR(string) | SSR(stream) | BFF | RSC |
|---|---|---|---|---|---|
| Netlify | ✅ | ✅ | ✅ | ✅ | ❔ |
| Vercel | ✅ | ✅ | ✅ | 🚫 | ❔ |
| Tencent EdgeOne | ✅ | ✅ | ✅ | ✅ | 🚫 |
| Alibaba Cloud ESA | ✅ | ✅ | ✅ | 🚫 | 🚫 |
| Cloudflare Workers | ✅ | ✅ | ✅ | ✅ | 🚫 |
| GitHub pages | ✅ | 🚫 | 🚫 | 🚫 | 🚫 |
Netlify
Netlify is a popular Web development platform designed for building, deploying, and maintaining modern web projects. Deploying on Netlify mainly requires configuring the netlify.toml file.
Depending on the complexity of your project, you can configure it incrementally by this doc.
Pure Front-end Project
Add the netlify.toml file to the root directory of the current project:
.
├── src
├── modern.config.ts
├── netlify.toml
└── package.json
Add the following content to netlify.toml:
[build]
  publish = "dist"
command = "modern deploy"You can refer to the deployment project example.
Now, add a project to the Netlify platform and deploy it!
Full Stack Project
Full-stack projects refer to projects that use Custom Web Server, SSR or BFF. These projects need to be deployed on Netlify Functions. Based on the netlify.toml file mentioned above, add the following configuration:
[build]
  publish = "dist"
  command = "modern deploy"

[functions]
  directory = ".netlify/functions"
  node_bundler = "none"
  included_files = [".netlify/functions/**"]
- Currently, Modern.js does not support deployment on Netlify Edge Functions. We will support it in future versions.
- You can refer to the deployment project example.
Monorepo
The following guide is mainly for full-stack projects, for pure CSR projects, just follow Pure Frontend Project to deploy.
For Monorepo projects, in addition to building our current project, you also need to build other sub-projects in the repository that the current project depends on.
We take a pnpm Monorepo repository as an example and deploy the Monorepo project on Netlify.
Assuming the directory structure of the Monorepo repository is as follows:
.
├── packages
│ ├── app
│ └── app-dep1
├── package.json
├── pnpm-lock.yaml
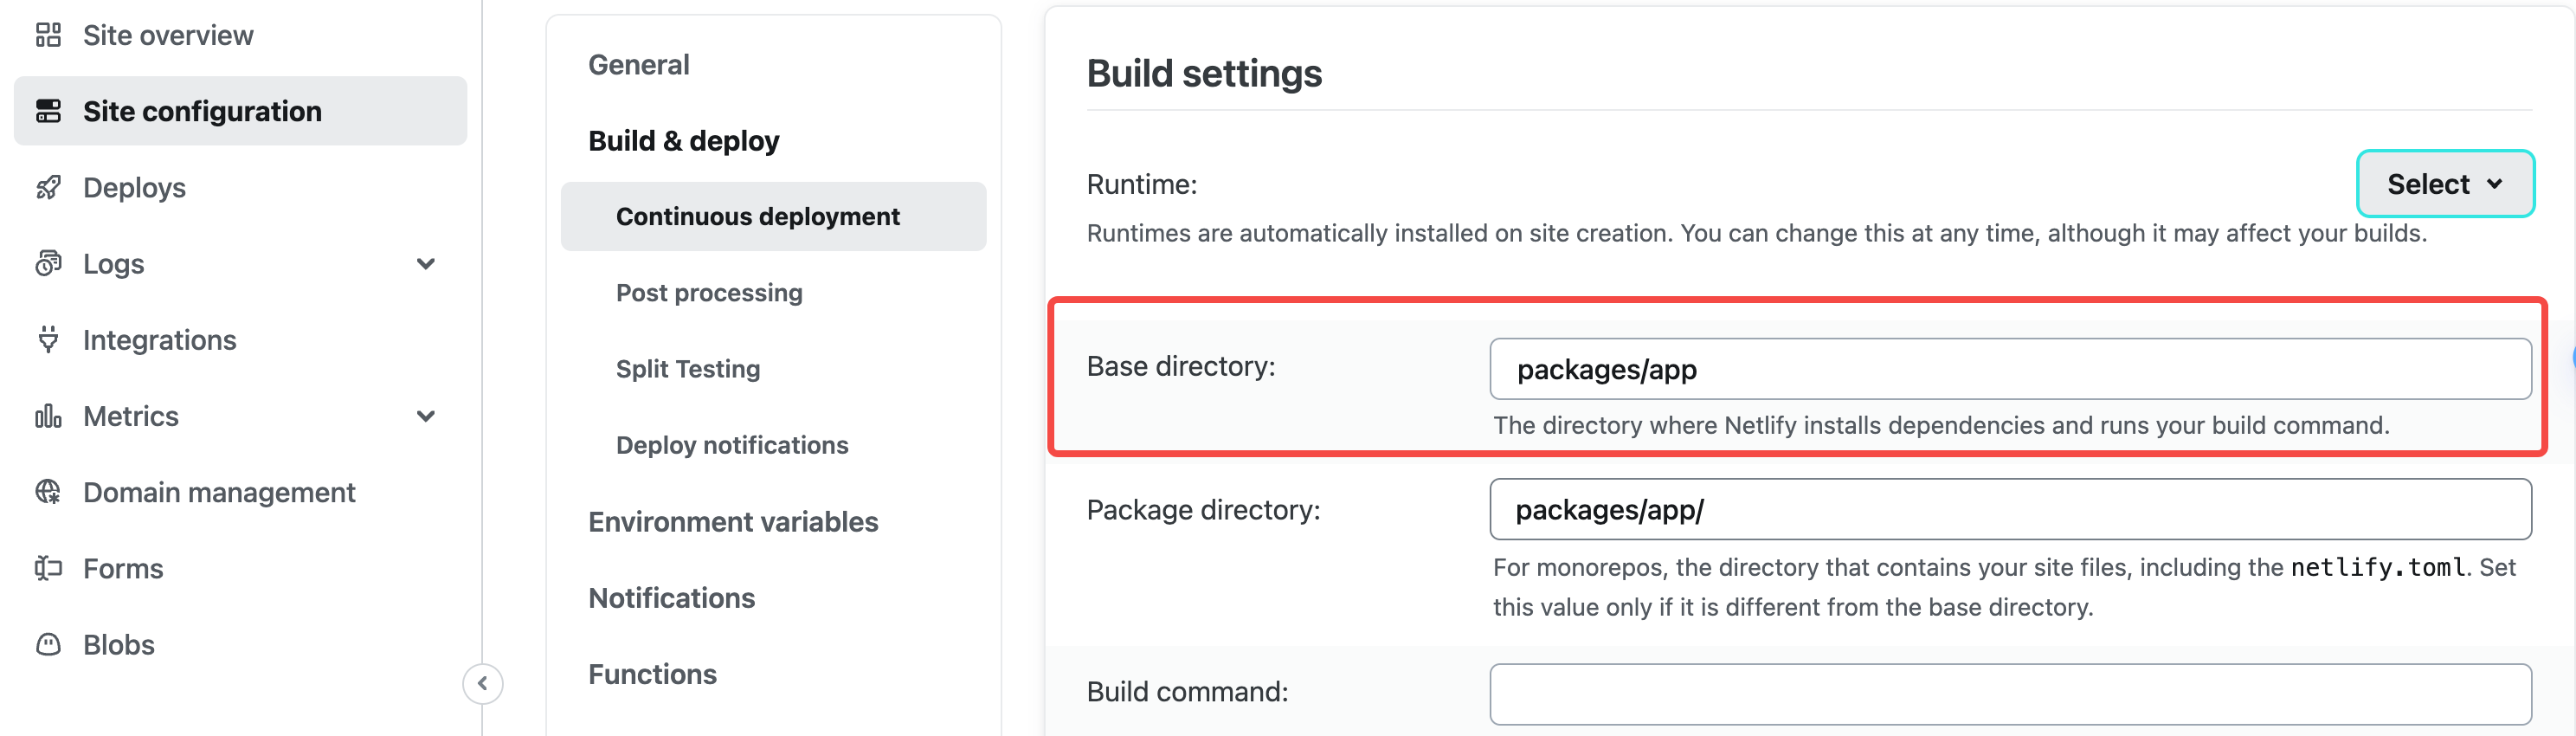
└── pnpm-workspace.yamlYou need to configure Base directory on the netlify platform as packages/app:
Add the following script in packages/app/package.json, before executing the deployment command of the app repository, first execute the build of other repositories in the workspace:
{
  "scripts": {
    "build:packages": "pnpm --filter 'app^...' run build",
    "deploy": "pnpm run build:packages && modern deploy"
  }
}
Configure the build command in netlify.toml:
[build]
  publish = "dist"
  command = "npm run deploy"

[functions]
  directory = ".netlify/functions"
  node_bundler = "none"
  included_files = [".netlify/functions/**"]
Just submit your code and deploy it using the Netlify platform.
Vercel
Vercel is a deployment platform for modern web applications that provides a rich set of features to support deploying static websites, server-side rendered applications, and more. To deploy on Vercel, you usually need to configure the vercel.json file, which you can configure incrementally depending on the complexity of your project.
Pure Front-end Project
Add the vercel.json file to the root directory of the current project:
./
├── src
├── modern.config.ts
├── vercel.json
└── package.json
Add the following content to vercel.json:
{
"buildCommand": "modern deploy",
"outputDirectory": ".vercel/output"
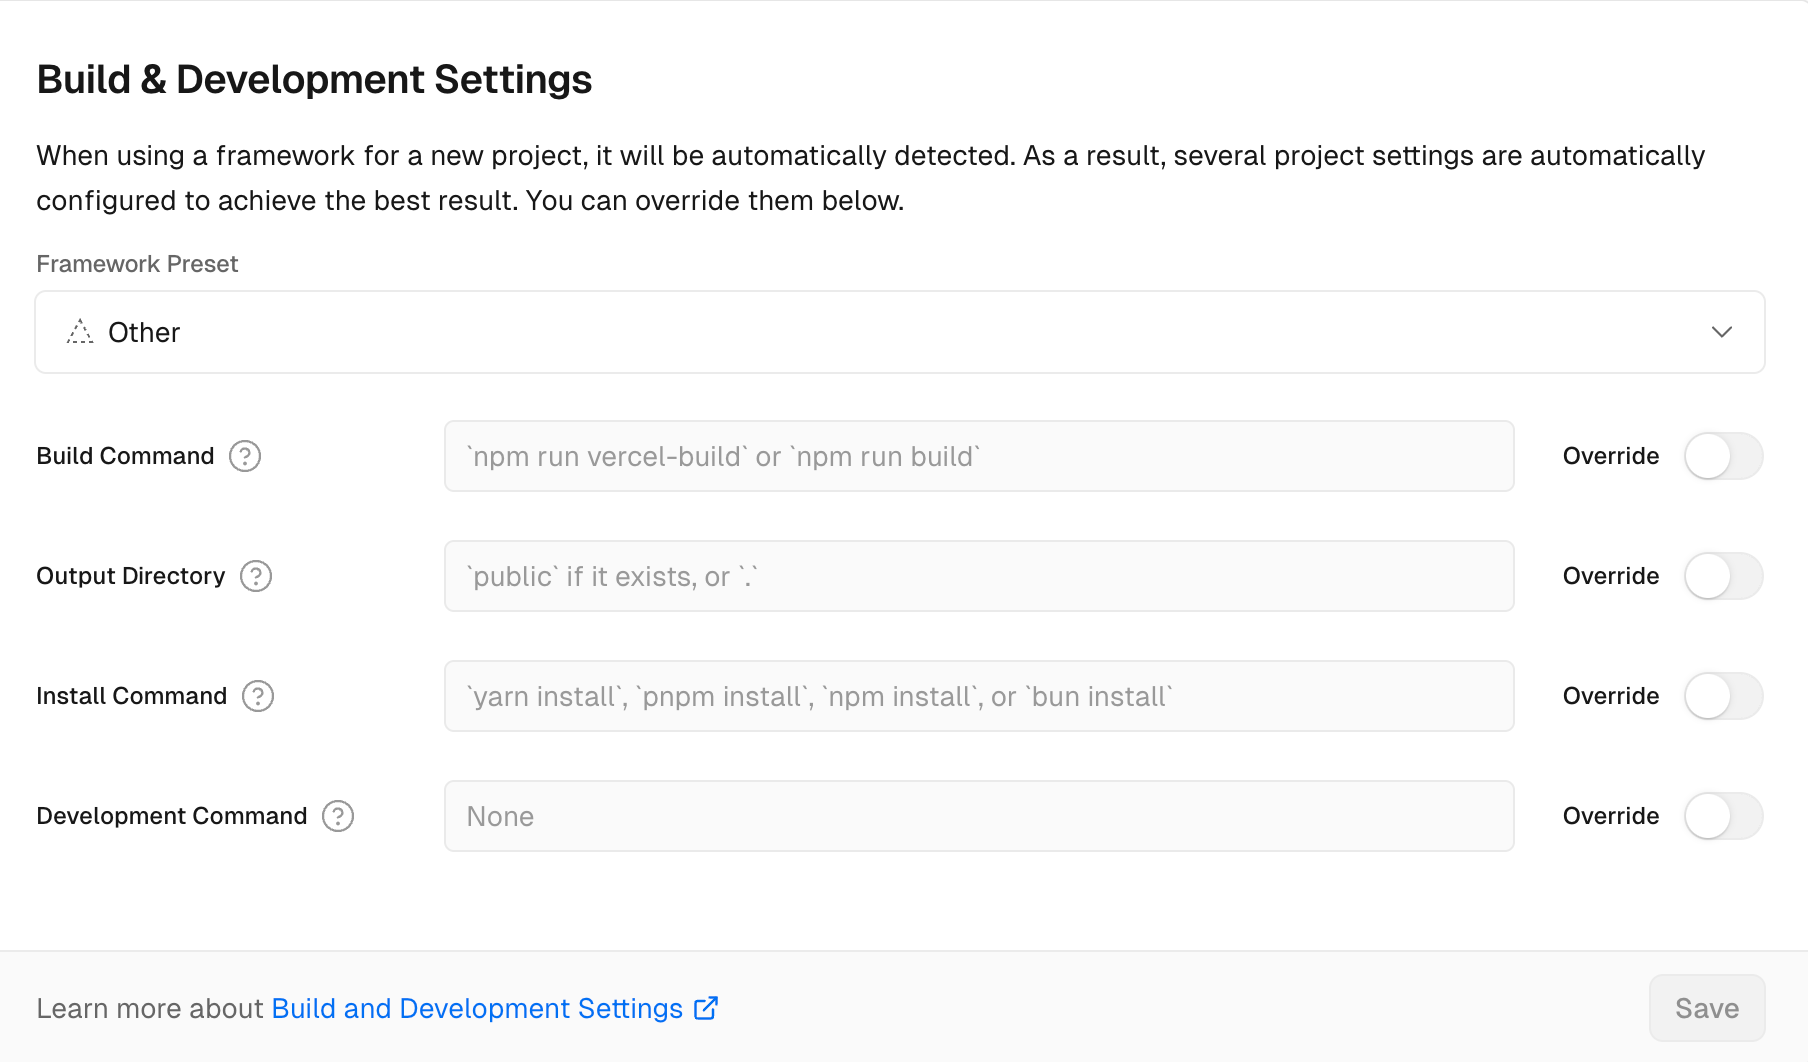
}Commit your project to git, select Framework Preset as Other on the Vercel platform and deploy.
You can refer to the deployment project examples.
Full Stack Project
Full-stack projects refer to projects that use Custom Web Server, SSR or BFF. These projects need to be deployed on Vercel Functions.
In addition to configuring vercel.json in the same way as a pure front-end project, please note:
- The Node.js version for function execution is determined by the project configuration on the Vercel platform.
You can refer to the deployment project examples.
Monorepo
The following guide is mainly for full-stack projects, for pure CSR projects, just follow Pure Frontend Project to deploy.
For Monorepo projects, in addition to building our current project, you also need to build other sub-projects in the repository that the current project depends on.
We take a pnpm Monorepo repository as an example and deploy the Monorepo project on Vercel.
Assuming the directory structure of the Monorepo repository is as follows:
.
├── packages
│ ├── app
│ └── app-dep1
├── package.json
├── pnpm-lock.yaml
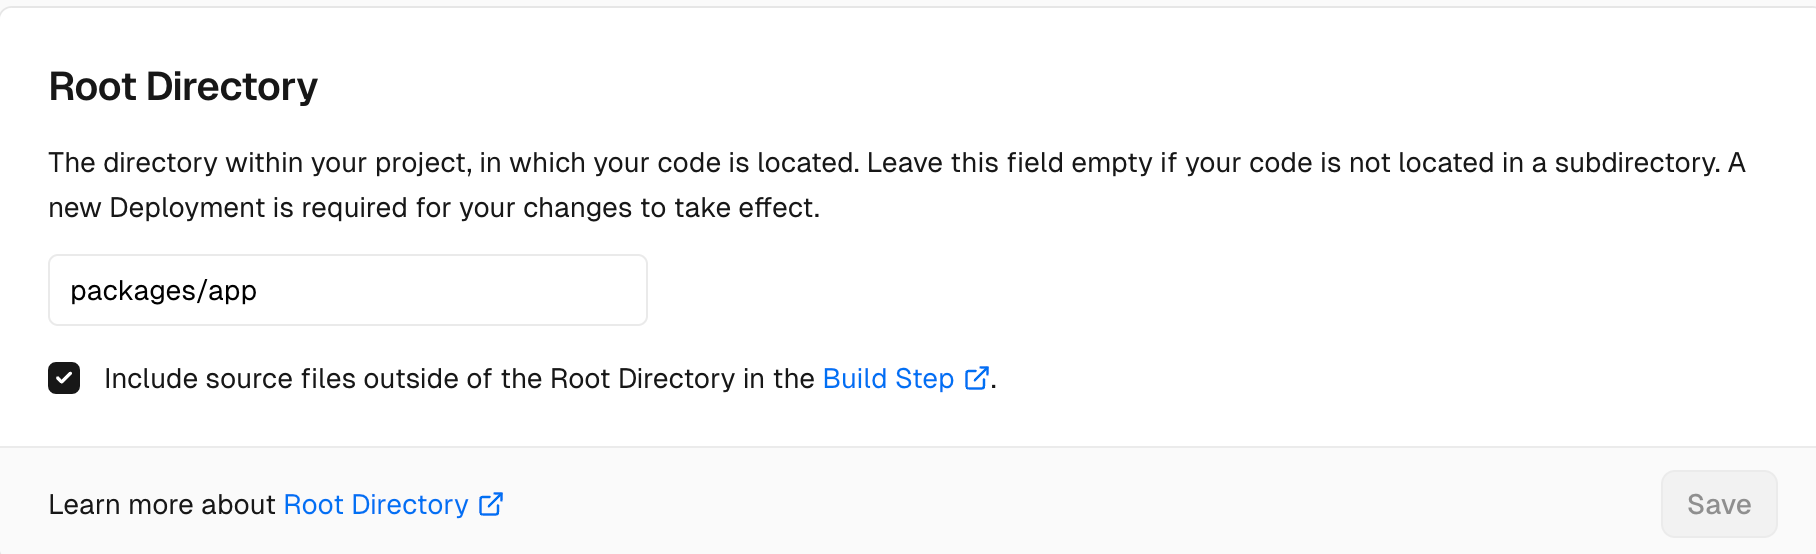
└── pnpm-workspace.yamlFirst, you need to configure the Root Directory as packages/app on the Vercel platform:
Specify Node.js runtime as 20.x:
"engines": {
  "node": "20.x"
}
Add the following script to packages/app/package.json to run build command of the other repositories in the workspace before run the deploy command for the app repository:
{
  "scripts": {
    "build:packages": "pnpm --filter 'app^...' run build",
    "deploy": "pnpm run build:packages && modern deploy"
  }
}
Add the following content to the packages/app/vercel.json file:
{
  "buildCommand": "npm run deploy",
  "outputDirectory": ".vercel/output"
}
Just submit your code and deploy it using the Vercel platform.
Tencent EdgeOne
Deploying on Tencent EdgeOne mainly requires configuring the edgeone.json file.
Pure Front-end Project
Add the edgeone.json file to the root directory of the current project:
./
├── src
├── modern.config.ts
├── edgeone.json
└── package.json
Add the following content to edgeone.json:
{
  "nodeVersion": "22.11.0",
  "buildCommand": "MODERNJS_DEPLOY=edgeone modern deploy",
  "outputDirectory": ".eo-output"
}
Now, submit your project to Git, select a repository on the EdgeOne platform, keep the default configuration, and deploy it!
Full Stack Project
Full-stack projects refer to projects that use Custom Web Server, SSR or BFF.
For full-stack projects, please configure edgeone.json as shown in Pure Front-end Project. Please note: Modern.js does not currently support deployment on EdgeOne Edge Functions; we will add support for this in future versions.
In both BFF and Data Loader, the EventContext of Tencent EdgeOne can be obtained in a manner similar to obtaining Cloudflare Workers Bindings.
Alibaba Cloud ESA
Deploying on Alibaba Cloud ESA mainly requires configuring the esa.jsonc file.
Pure Front-end Project
Add the esa.jsonc file to the root directory of the current project:
./
├── src
├── modern.config.ts
├── esa.jsonc
└── package.json
Add the following content to esa.jsonc:
{
  "buildCommand": "MODERNJS_DEPLOY=aliEsa modern deploy",
  "assets": {
    "directory": "./.ali-esa/dist"
  }
}
Now, submit your project to Git, select a repository on the Alibaba Cloud platform, keep the default configuration, and deploy it!
Full Stack Project
Full-stack projects refer to projects that use Custom Web Server, SSR or BFF.
In addition to configuring esa.jsonc as in Pure Front-end Project, full-stack projects need to add an entry field:
{
  "entry": "./.ali-esa/functions/index.js"
  /* Other configurations... */
}Cloudflare Workers
Deploying on Cloudflare Workers mainly requires configuring the wrangler.jsonc file.
Pure Front-end Project
Add the wrangler.jsonc file to the root directory of the current project:
./
├── src
├── modern.config.ts
├── wrangler.jsonc
└── package.json
Add the following content to wrangler.jsonc:
{
  "$schema": "./node_modules/wrangler/config-schema.json",
  "compatibility_date": "2025-10-08",
  "assets": {
    "directory": "./.cf-workers/assets",
    "binding": "ASSETS"
  },
  "build": {
    "command": "MODERNJS_DEPLOY=cfWorkers modern deploy"
  }
}
If you are using the local Wrangler CLI for deployment, you also need to configure the name field, entering your Cloudflare Workers project name.
Commit your project to Git, select a repository on the Cloudflare Workers platform, keep the default configuration, and deploy it!
Full Stack Project
Full-stack projects refer to projects that use Custom Web Server, SSR or BFF.
In addition to configuring wrangler.jsonc as in Pure Front-end Project, full-stack projects need to add an those fields:
{
  "compatibility_flags": ["nodejs_compat"],
  "main": "./.cf-workers/functions/index.js",
  /* Other configurations... */
}
In a BFF, you can use useHonoContext to retrieve bindings; in a Data Loader, you can use context to retrieve bindings. Please refer to their respective documentation for details.
GitHub Pages
If you're creating a GitHub Pages for a repository without a custom domain, the page URL will follow this format: http://<username>.github.io/<repository-name>. Therefore, you need to add the following configuration in modern.config.ts:
import { defineConfig } from '@modern-js/app-tools';

export default defineConfig({
  //...
  server: {
    baseUrl: '/<repository-name>',
  },
  output: {
    assetPrefix: '/<repository-name>',
  },
});
GitHub Pages supports two deployment ways: branch deployment or GitHub Actions deployment.
For branch deployment, follow these steps:
- In the GitHub repository, navigate to Settings > Pages > Source > Deploy from a branch
- Install the
gh-pagesas devDependency - Add the following script to
package.json
"scripts": {
  //...
  "deploy:gh-pages": "MODERNJS_DEPLOY=ghPages modern deploy && gh-pages -d .output"
}- Run
npm run deploy:gh-pages
:::info
- Running
MODERNJS_DEPLOY=ghPages modern deploywill build the production output for GitHub in the .output directory. - You can refer to the project :::
For GitHub Actions deployment, select Settings > Pages > Source > GitHub Actions, and add a workflow file to the project. You can refer to the example.